The Party Dress
A Pattern and Tutorial
Supplies:
2 coordinating fabrics
-Approximately 1.5 yards of main fabric
-Approximately 1 yard of accent fabric
4 buttons - fabric covered or plastic (I used size 36)
Bodice pattern pieces (click
HERE to print)
Sewing machine
Thread
Hand sewing needle
Iron
Ironing board
Scissors
Directions:
5/8th seam allowance, unless otherwise noted.
Cut pattern pieces. Print bodice pattern pieces and cut as directed.
Click
HERE to print bodice pattern pieces.
Cut 1 front bodice piece on fold and cut two back bodice pieces (not on fold). Do this for the main, exterior fabric and then again for the lining fabric.
I have included size 18 month thru girls size 5. Unfortunately the bodice back did not scan for size 18 month, so just reduce size 2T by 1/2" for the 18-24 month bodice back. If you need to go up to size 6, 7 or 8 or down to size 6-month, reduce or add .75" to the exterior of the bodice. Once you have cut your bodice pattern pieces, you will have six bodice pieces. Three for the exterior and three for the lining.
Cut main skirt pieces. Skirt measurements are based on the dress hitting at mid to lower calf. Adjust accordingly if you prefer a different length on your little one.
Skirt front (cut ONE on fold) measurements are as follows:
18-24 months: 20.5" x 12.75"
2T: 20.5" x 13.5"
3T: 20.5" x 14.25"
4T: 20.5" x 14.75"
5: 20.5" x 16.25"
These are just approximate dress lengths so make sure you measure your child to check the appropriate length for their dress.
Skirt back (cut TWO) measurements are as follows (Width x Length):
18-24 months: 21.5" x 12.75"
2T: 21.5" x 13.5"
3T: 21.5" x 14.25"
4T: 21.5" x 14.75"
5: 21.5" x 16.25"
Cut skirt band (same for all sizes):
Cut 2 on fold - 42" x 5"
Cut dress sash:
18 month and 2T measurements as follows:
Cut 2 pieces 7" x 18"
Cut 1 piece on the fold 7" x 23" (total length 7" x 46)
3T, 4T, and 5 measurements as follows:
Cut 2 pieces 10" x 23"
Cut 1 piece 10" x 23" (total length 10" x 46")
Cut fabric for button loops:
1 piece 1" x 16"
In the next few steps you will see that I used my serger. You absolutely DO NOT need a serger. You can do all of these steps on your regular sewing machine. My serger just happens to make me work a little faster and I like the finished edge. You can also finish your edges with a zig-zag stitch or use pinking shears to prevent fraying.
Place skirt band pieces right-sides together. Stitch along both shorter ends to create a circle.
Place main skirt pieces right-sides together. Stitch both back pieces to the front piece at the side seams.
Stitch the back two skirt pieces together, but leave a 3 inch opening at the top. Press all seams open.
Fold skirt band in half (length-wise) with wrong-sides together. Press with iron.
Place the raw edge of the skirt band along the raw edge of main skirt pieces. Skirt band should be placed on the right-side of the main fabric. Stitch all the way around the bottom of the skirt to attach the band.
Press skirt band seam open. Press the seam up towards the main dress fabric.
Top-stitch 1/8" from the bottom of the main skirt fabric. I believe top-stitching is what gives garments are truly professional look, so even though it might be tempting to skip this step, I wouldn't recommend it. Also, by pressing your seam up toward the main skirt fabric, the top-stitching will lock this seam in place.
Press the top-stitching with a hot iron. This will set your stitches nicely.
Now it's time to make the button loops for the back of the dress. Take the piece of fabric you cut previously.
Fold it in half, right-sides together. Stitch down the long-side. 1/8" seam allowance.
Here is your long narrow tube of fabric ready to be turned. Turn fabric right-side out.
Once your long tube is turned, press with your iron. You can easily turn this long tube with a bobby pin or a small crochet hook. They also make inexpensive tools in the notions section of your sewing shop, just for turning little skinny bands of fabric, so check those out as well. It can take a little work to get this skinny tube turned. Cut the long tube into four even pieces - 4" each.
Now onto the bodice. This bodice is fully lined and the skirt piece is entirely encased within the bodice. This makes for a truly high-quality dress. For special occasions, I definitely think the little ladies deserve the best!
Stitch the side seams of the bodice. With right-sides together pin the back bodice pieces to the front attaching at the side seams. Do this for the exterior and the lining. Stitch in place.
Press your side seams open. Then press 3/4" of the bottom of the bodice up (wrong-sides together). Do this for both the exterior and the lining.
Next, pin your button loops in place. The raw edge of the loop should be lined up with the raw edge of the bodice. For the 18-24 month size I spaced them about 1.25" apart, but adjust them accordingly for the larger sizes. They should be spaced so that the final one is about an inch above the bottom of the bodice.
Stitch or baste in place to make sure they don't slide around in the next step. 1/2" seam allowance.
Place the bodice exterior and bodice lining right-sides together. Pin in place.
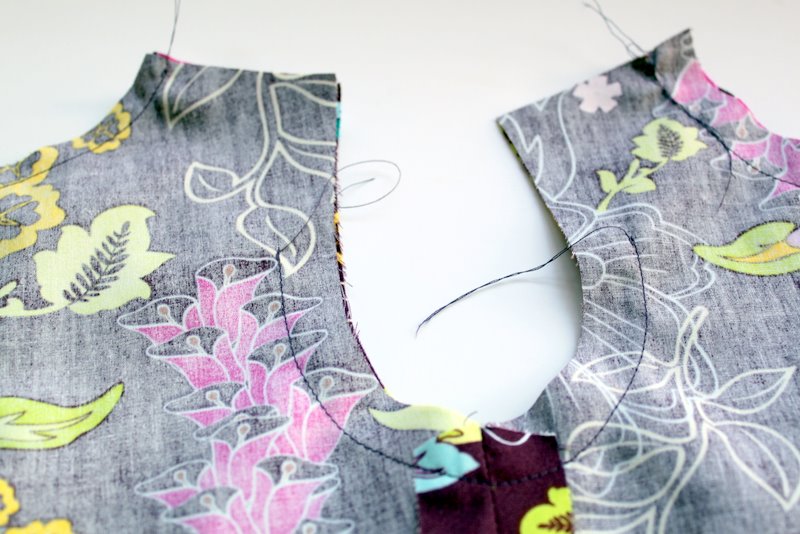
The next step gets a little complicated. You are going to stitch around the sides and top of most of the bodice, but leave the tops of all the shoulders open. See the picture below and notice how I stitched. I stitched around the neck, under the arm holes and down both sides. Again, look very closely at the picture below.
See how I left the top of the shoulders open and a little ways down the under arm (about 3 inches)? You will need to do this to make a nicely lined bodice.
Again, just some more pictures so you know where to stitch. Once you have stitched the bodice together, turn right-side out. Clip all of the curves and corners. Do this by notching to remove bulk. Press with your iron. You will need to really work the bodice with your iron to get it to lay nice and flat.
Here is the bodice after it has been pressed open. Notice that the top of the shoulders are still open as well as the bottom.
Now for the trickiest step of all - attaching the shoulder seams. Use your iron to press the arm seams under - it will make the next step easier.

Turn your shoulder seams, right-side together. Place lining to lining and exterior to exterior and stitch one long seam across the top. It may seem a little strange, but it works. Do this on both shoulder seams.
Once you have sewn your shoulder seams, you will still have a little opening around the arm holes.
Press this fabric under so that it lines up with the rest of the arm hole. Now you have two options, you can either close this hole by hand-sewing it closed or you can top-stitch around the arm hole to close it. Either way works - it's really whatever look you prefer.
If you top-stitch the opening closed, press your stitches to set them and use a 1/8" seam allowance.
Now to gather the skirt. Run a gathering stitch across the top of the skirt piece. Do this by setting your straight-stitch to the longest length (on my machine it's 5.0) and stitch all the way around the skirt top. Do not back-stitch or your skirt will not gather. You will start in the middle of the back where you left the 3" opening and end there as well. Do not close the little opening.
To gather, pull your bobbin thread and gather to fit within your bodice size. Do this by trial and error until it fits just right.
Place the skirt 1/2" up in between both bodice pieces (exterior and lining). Line up the opening in the back of the skirt with the opening in the bodice. All of the skirt should be tucked up under the bodice. Pin in place and top-stitch using a 1/8" seam allowance.
Now for the sash. Stitch the three sash pieces together at the short seams - right-sides together. The long piece should be in the middle between the two shorter pieces.
Fold the long sash piece in half, right-sides together, and cut both ends on a diagonal. Stitch sash closed, but leave a 3-4 inch opening in the side. Use this opening to turn the sash right-side out. Press your sash. Hand sew the opening closed.
Pin the sash to the sides of your dress. It's a good idea to try the dress on your child for this step. Make one pleat in the side. The sash should start right underneath the arm hole. Stitch sash in place at side-seams.
Mark the back of the bodice for button placement. Don't worry, this was a dress-form I was working on.......I did not put pins in the back of my daughter! The side with the button loops should cross over just about 1/8" - 1/4" over the other side.
Hand-sew your buttons in place according to your markings.
Whew!!!! And now you're done! Now go try "The Party Dress" on your little lady and see how adorable she looks!
I used Art Gallery Fabrics "Paradise" in
Twilight Pond for my main fabric. The coordinating deep teal is a
Dupioni silk. Another coordinating cotton fabric would be beautiful for the accent fabric as well.
I have a thing for fabric covered buttons - I L.O.V.E. them! You can find covered button kits in the notions section of your local sewing store. They are super-easy to make and add a timeless, vintage flair to garments.
And here's my little Matilda Jane wearing "The Party Dress". She loves it!!
Now it's time to party!


 Turn your shoulder seams, right-side together. Place lining to lining and exterior to exterior and stitch one long seam across the top. It may seem a little strange, but it works. Do this on both shoulder seams.


No comments:
Post a Comment