Thursday, May 27, 2010

Porch Sign


While Daddy's Away, Mommy Will Play

So my husband is gone for the next two weeks, which means two weeks of crafting and projects without feeling guilty!  It was finally a nice warm day today, so the girls and I headed to Ace for materials for today's project.  We made it through the store quickly and with no drama!  And we came home with this.
 2x2, 1x6, 1x4, 4x4

I had seen a really neat tutorial here to make your own candle sticks and I had seen a tutorial here to make candle stick hangers at Drab to Fab.  I loved the candle sticks but didn't trust my kiddos not to touch in the house (4x4's are heavy) so I decided to combine the 2 and make something for my front step.


I cut my 4x4 24" long.  I cut my 1x6 down to make 2 5 1/2"x5 1/2" squares and 2 4 1/2"x 4 1/2" square.


I stacked the 4 1/2" square on top of the 5 1/2 square and screwed the 2 together from the bottom.  I then attached it to the 4x4, flipped it over and repeated.  After this step you want to make sure everything is square.  The girls helped to make sure it was nice and sturdy.


I gave it a quick coat of spray primer and then a light coat of heirloom white along the edges.  When it was dry 2 minutes later (ha ha, I 'm surprised anything I do turns out because I don't have the patience to wait the recommended time) I gave it multiple coats of flat black spray paint.


Once the black was dry 15 minutes later I used my sanding sponge to distress the edges.


I bought the cheapest hook I could find and sprayed it ORB.  While I waited for this to dry, yes I actually gave it 15 minutes I went in the house to make my sign.  I used the 1x4 I bought and cut it to 11", sprayed it heirloom white, sanded the edges and then inked it with an ink pad.


I used my cricut to cut the vinyl, slapped it on, drilled 2 holes at the top and used beading wire for the hanger.


I have already decided to make some different signs to hang for the different seasons, but for now Welcome will do.


Tuesday, May 25, 2010

Mud Room Cabinet


Tuesday, December 1, 2009


J.O.Y.


Today was

"project day"

for me around here.

Finally!

The boys were at school and Will took Ellison out for the day so that I could get some things accomplished without the endless interruptions that occur when everyone is here.

I was alone.

In my own home.

(I was giddy!)

It's a rare occurence, so I took full advantage of it.

One of my projects was to get the built-in-cubbies in the entryway ready for Christmas. Since this is our first winter with our newly built organization system, I went through each of my boxes of Christmas decor looking for just the right items to dress them up.

Garland and berries were a given.

Pinecones too.

And red Christmas balls.

But I didn't have anything to fill the empty space in the display cubbies.

So I added a little...

J O Y

I had Will cut three 4 & 1/2" x 12" strips of pine board that I could lean against the back of the cubby. I wanted to add more green to the decor mix, so I painted them an apple green and then washed the boards with a watered down mix of black and brick red craft paint. (This was a use-what-you've-got project, so I made do with what I had)...

I painted on the letters the same way that I did on the oar in our Master Bedroom. I wanted these letters to have a hint of sparkle, so after the white paint dried, I went back over it and painted on a thin, white line of paint following the right hand side of each letter. It acted as my glue for the glitter...

It took no time at all and I think they turned out great!


The apple green ties in perfectly with the ornament wreath that the boys and I made last night...

I'll be posting more about this in a few days, but for now I'll say...

if you follow Sarah's instructions to a T, you won't have any problems.

If you don't, well...you may end up just as frustrated as I did!


Don't get me wrong, the wreath is super cute, inexpensive (a pack of 5 shatter-proof ornaments for $1.00 - nice!), and easy (I use that term lightly) to make, but if you don't take the necessary preparations, it ends up being a huge pain...

I'll be making another wreath, for sure.

This time following her instructions...

I would love to make a pink wreath for Ellison's room.

A blue one for Owen's room.

William would love a green one of his own.


They're addicting, I tell you! You can't buy a wreath this cute for this cheap!


I had other plans for this wreath when I began the project, but it turned out much smaller than I had anticipated. I had about 40 ornaments to work with, so if you're going for a big wreath, you're going to have to get lots and lots of ornaments!

This one found it's place hanging on a hook in the entryway...

As for the overall look...

I like it...a lot!

I did another project in the entryway today.

A big one.

Coffee Table to Bench Seat


MONDAY, MAY 24, 2010

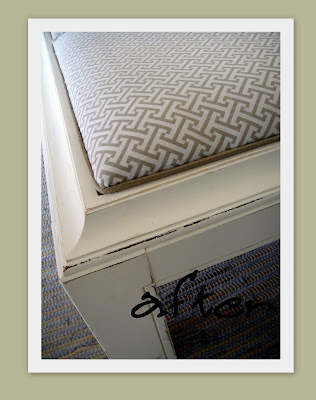
I hope by now that you all know how much I love when a project that involves re-imagining and reusing something that we already have.  So,, when I saw this project I had to ask if I could share it. Jenni from Peppertowne did a fabulous job with an old coffee table, check it out:


Confession:  I lost the 'before' picture for this project.

I swear I took the pic.  But where is it?
I've search through the endless piles of photo chaos on my computer.  Oh, don't judge me.  You know the photo chaos...you've been lost in it too. 
The abyss of unmarked photos scattered all over your computer.  

Promise: I promise to save my pictures in a marked and uber-organized way.  At lease until I'm in a hurry or the cheese quesadillas are burning...

Craigslist rules!  I found a photo similar to the coffee table I originally bought.
My coffee table cost me $10 bucks.  But, I needed a window seat!  
I was looking something with modern lines and a neutral feel.

TAA-DAA!!


This was an easy project with some basic upholstery. 

Step #1: Prep and paint the wood frame.
After removing the lovely smoke mirrored glass, I painted the table and then sanded up the edges a bit to let the dark wood show through.

Step #2: Cut some wood board to replace the glass mirrors. 

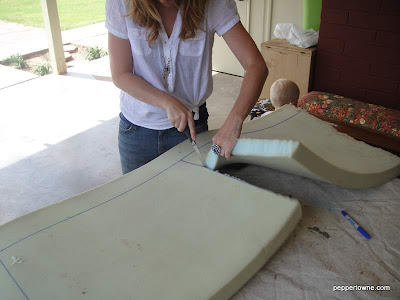
Step #3: Cut a piece of foam for the bench seat.  The best way to cut foam is a band saw.  But if you don't have one, the second best way is with a sereded kitchen knife.
Glue the foam to the board using spray adhesive.


Step #4: Using a staple gun, cover the foam with a liner cloth. 
Securely staple on the backside of the board.  Use a firm even pressure around the edges.  As you can see in the picture, I use my body weight to push foam in and then staple the fabric.  This makes a nice rounded edge on your seat. 


Step #5: Cover your seat with the upholstery fabric.
Using the same technique as the liner cloth, use a firm even pressure and staple the fabric in place.  Always cut away and excess fabric.  Pull your corners in and staple them like crazy. Remember, the underside of your project doesn't have to look perfect.  This is not an art of perfection...and that's why I love it!  Also, I'm using an air powered staple gun, which is the bomb.  If you don't have access to one of these, a hand powered gun is great.  I've done many many project with a hand gun.
Step #6: Staple your trim.
Adding a trim gives finished look to your project.  Here I choose a burlap natural fiber that fit in with my neutral scheme.  Simply, staple the trim along the edge of your board. 
 
Here's a trick I learned from a great upholsterer, when the two ends of your trim meet, simply unravel the ends, cross them over each other and staple in place on the underside of the board. This way your cushion will fit perfectly without the added bulk of the extra trim.


 Step #7: Put your bench together.
Add a few L brackets to secure your seat.

That's it!
Enjoy your bench!


Isn't it lovely! 
 I love the fabric, I love the color and the slight distressing, 
I really love it all!


Read more: http://www.remodelaholic.com/#ixzz0oxfzu6Vb

Sunday, May 23, 2010

Crayon Roll


guest blogger: lindsey of pleated poppy


hello! i'm lindsey from the pleated poppy.

by day i'm a mom to 3 littles and a part time home schooler.

by night i'm a blogger and shop keeper, working away into the wee hours in my little sweat shop.

i have a deep love for all things fabric: drooling over it online, buying, sewing, organizing, pairing up favorites. i am really thankful that my business allows me the excuse to buy all the fabric i want!


one of the long time staples in my shop has been crayon rolls.

these are perfect for gifts!
each of my girls have one and silas (2 1/2) has been begging for one, so i made up this adorable one for him. these are great for throwing in your purse, for keeping the littles busy in the car, waiting rooms, restaurants... and when they're done, they love that each crayon has its own little home

and they can roll it up themselves and secure it with the elastic.
so, are you ready for the tutorial? here you go!

supplies:

2 pieces of same fabric for outside and inside - 5" x 16 1/2"


1 piece of coordinating fabric for pocket - 6" x 16 1/2"


1 piece of flannel for lining - 5" x 16 1/2"


1 coordinating hair elastic


1 button


needle and thread


1 box of 16 crayons (i get mine at walmart)


disappearing ink fabric marker


1. cut out all 4 pieces of fabric


2. fold pocket piece of fabric in half length-wise and iron flat.


i have found that it helps to actually PLUG IN the iron, and not the nearby vacuum cord.


crazy how that works!


3. lay out flannel piece.


its just a lining to give the roll a little more stability.


then lay one of the 5" wide pieces on top of the flannel (wrong side down),


then pocket piece on top of that, lining up all bottom edges.


pin at the ends.


4. find the midpoint of the pocket at 8 1/4".


with your fabric marker and a straight edge, mark the middle line.


5. then make a line every inch, until all 15 lines have been drawn.


see how the space after the last lines on each side is a little wider than 1 inch?


that's to allow for the seam allowance.


6. now stitch down the pocket.


i start at the center line, 1/4" below the top of the pocket, and back stitch (very important!),


then run your stitch all the way down.


work your way down the lines to the right, then to the left, until all lines are stitched down.


trim threads.


7. if you have a tag to add, do it now.


also stitch down the elastic on the far right side.


i take the seam part of the elastic (where its melted together) and pinch it.


i stitch it down just inside the edge, about a 147 times.


ok, not really but i really want to make sure the elastic holds when little hands are tugging on it.


8. now lay the outside piece on top of all that you have just attached together,


right sides together, and pin at each corner.


9. next stitch all pieces together with a 1/4" inseam.


start at the short end without the elastic, leaving about a 2" opening to turn right side out.


i marked my opening so you could see my placement.


clip the corners.


10. turn right side out and gently poke out corners. i like to use a chopstick for this.


11. spray your stitched down pocket lines with water before ironing crayon roll flat.


sometimes if you don't spray the marker lines,


when you iron it it makes the ink permanent rather than disappearing.


12. press all the edges flat and tuck in the edges of the opening.


13. starting just below the elastic, stitch very close to the outer edge to hold all the pieces together.


14. organize your crayons (my *favorite* part!) and tuck into pockets.


15. roll up tight.


gently stretch the elastic to find where the button should be sewn down.


sew on the button securely.


16. you're done!


find a cute little one to give this to and make their day!


i so hope you enjoy this little project!


as a thank you for reading through this very long tutorial,

use the code VANDCO for 15% off your order in my shop!

thanks vanessa, for inviting me over!

-lindsey

wow thanks lindsey! that's fantastic! okay well one more day and i should be on my way home from the wonderful world of fabric and patterns and designers. i hope i'm not in some corner rocking back and forth repeating in muttering words: "i'm not worthy i'm not worthy."
but knowing myself...yup someone check the corners.
we'll talk soon, have a nice rest of the weekend and i hope to see you on monday.