This project I'm sharing with you today was inspired by my son. He always wants to help with dinner, and I try to let him help wherever he can with the prep work, but while I'm doing the cooking, he likes to help by setting the table. This placemat was designed to help little kids do just that, showing them where to put the plate, knife, fork and spoon. So I give you the . . .
These Table Setting Placemats are fun and functional. They bring together some of my favorite techniques: painting, sewing and quilting.
The knife, fork and spoon are painted on using freezer paper and fabric paint
and the top of the placemat is pieced together to allow a fun fabric in the middle. They can be bright and fun like mine or made to coordinate with your kitchen colors or patterns. It has very simple quilting to make it a quick project.
Your kids will have fun setting the table
My three-year-old got in on the fun and set the table too. (I love those tiny fingers!)
Then, of course, you must sit down for a little "snack" and some fun too.
So let's make this placemat!
You'll need:
the Knife, Fork and Spoon template
fabric paint and brush
freezer paper and craft knife
thread, scissors, sewing machine, iron, etc...
For each placemat you'll make, you'll also need:
middle front fabric 12" x 12"
left front (fork side) fabric 3.5" x 12"
right front (knife/spoon side) fabric 4.5" x 12"
back fabric 18" x 12"
low-loft batting 18" x 12"
seam binding (home-made or store bought), 1/2" wide, double fold, approx. 70"
The fabric I used for the top pieces are Metro Cafe Flatware in Vintage (Robert Kaufman) and a linen/cotton blend in off-white. The binding is a small polka dot print from Robert Kaufman. The back is a print I had lying around from Jo-Ann's.
Seam allowances are 1/2" for this project, unless otherwise noted.
Start by sewing your middle front piece to the left front and the right front on the left and right sides, respectively. Iron flat and set aside.
Using your template, cut out the knife fork and spoon onto freezer paper. Cut the fork on a separate piece from the spoon and knife. Hint: If you're making more than one placemat, you can put a couple pieces of freezer paper under the template to cut out a few at a time.
Once you've made your stencils, iron them onto the top of the placemat. (Fork on the left, knife and spoon on the right.)
Paint the knife, fork and spoon using whatever colors you like. I chose colors that would compliment my center fabric. (Mandarin Orange, Lime and Turquoise). For some extra tips on freezer paper and painting go here.
Allow the paint to dry before removing the freezer paper and when the paint is completely dry, heat set the paint by ironing it. You should feel a texture difference after heat treating (it will now be smooth instead of rough).
Take your back fabric piece and lay it right side down. Next place the batting on top and finally your placemat top, right side up. Pin these layers together for quilting.
Since this is a small placemat, you don't need a special quilting foot for your machine (but of course you can use one if you like). Start by stitching in the ditch along the division between the left/middle and middle/right of your placemat top. (This means simply stitch in the seam line between your top fabric pieces.)
Now slowly sew around your fork close to the paint, roughly a 1/8" away from the edge.
Repeat for the knife and spoon.
To quilt the space for the plate. Go to the kitchen and grab a plate or large bowl and trace around it with chalk or a fabric pen.
Repeat with a slightly smaller plate or bowl for a smaller inner circle.
Sew on these lines and remove any markings from your pen/chalk when you're done.
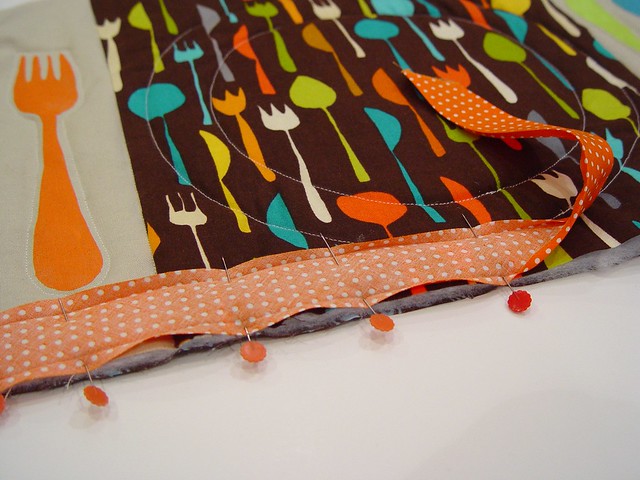
Sew on the binding. Start by opening the binding and pinning the edge of the binding to the edge of the placemat (right side down), leaving a tail of about 5".
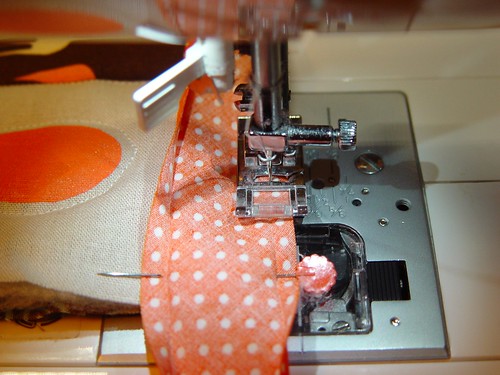
Start sewing down the seam binding, by sewing in the fold line. Since I made my seam binding, I chose not to waste extra fabric, so I only have about 1/4" from the fold to the edge. You may have more.
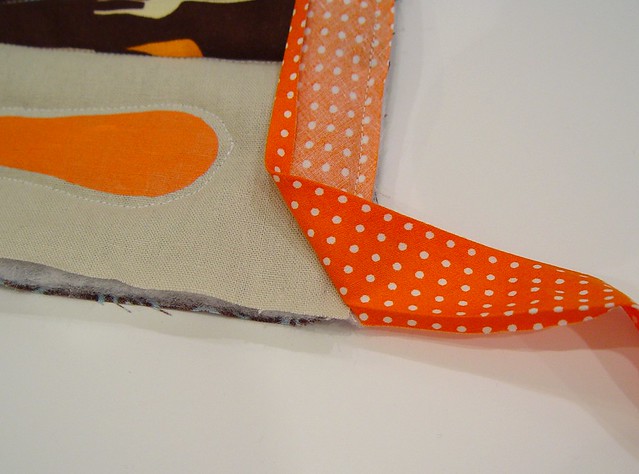
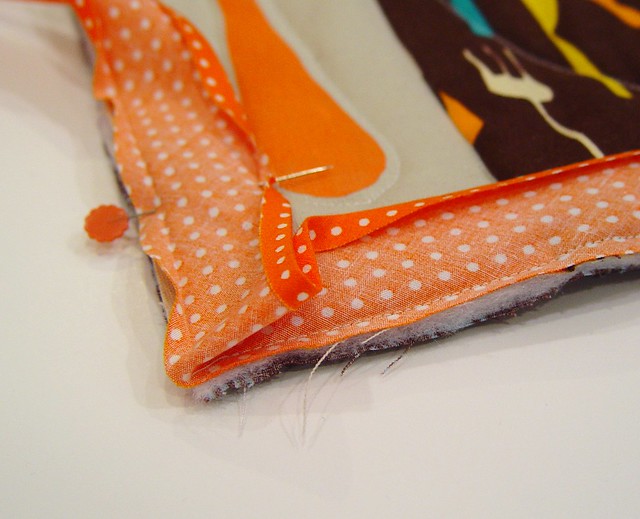
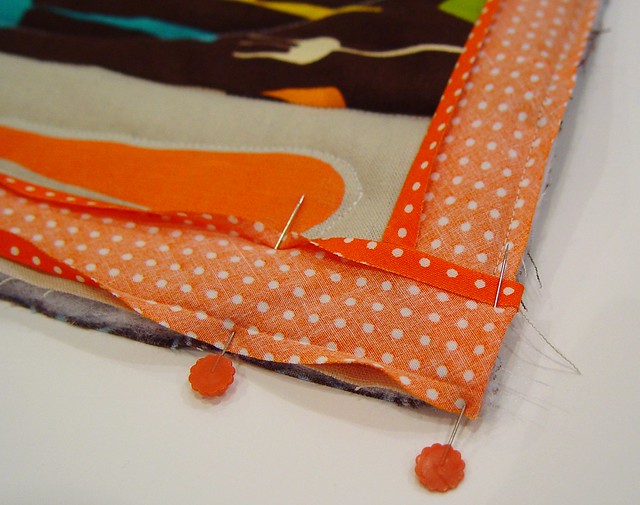
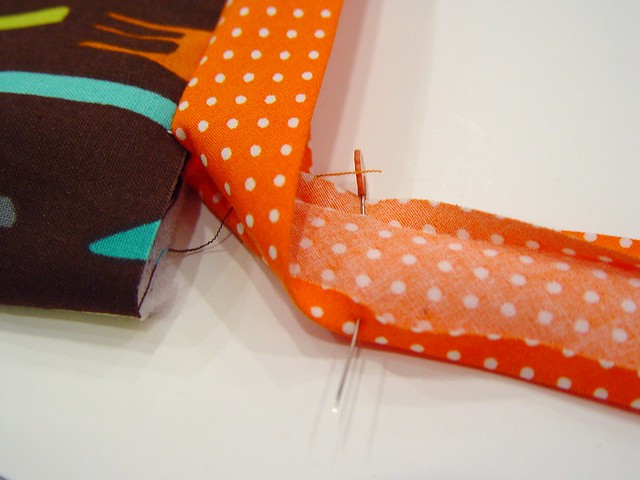
When you reach a corner, stop approx 1/4" from the end. (More if your seam binding has a larger distance from the fold.)
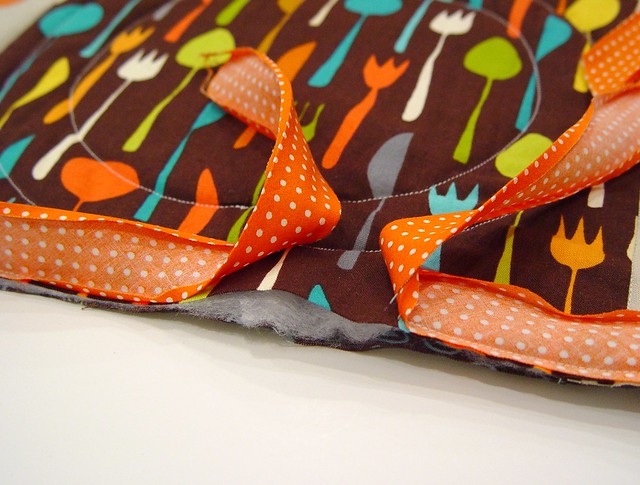
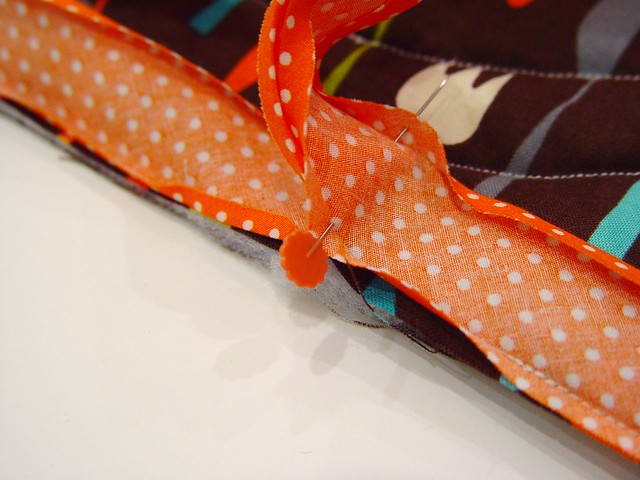
Fold the seam binding up
then down (at the edge of the placemat).
Continue sewing until you've gone all the way around stopping a few inches from where you started.
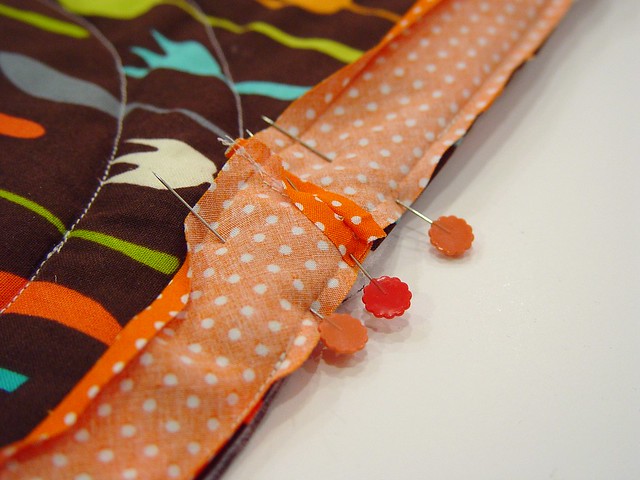
Lay the seam binding out flat and pin where the two pieces come together.
Pull the seam binding away from your placemat and sew them together. Trim the excess.
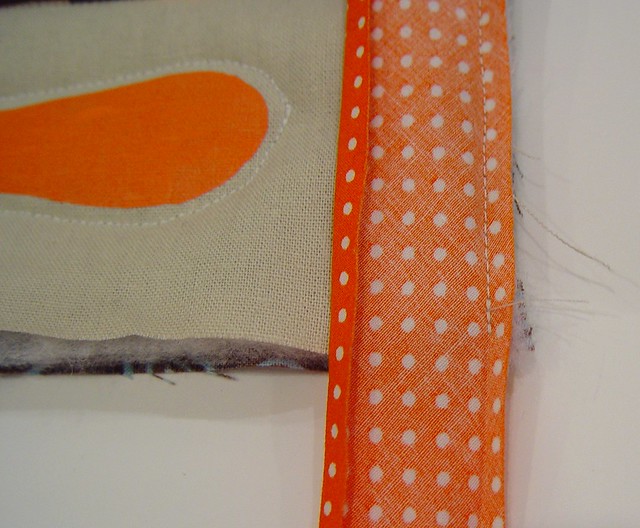
Lay the binding flat onto the placemat and stitch in place.
Fold over the seam binding and stitch in place by hand, making sure your thread doesn't show through to the front side.
And you're done!
So go ahead make one or two . . . or six!
Friday, April 15, 2011
Thursday, April 7, 2011
Sippy Cup Leash
Make
Make it and Love itWell, it needed some improvements.
Before moving across the country last winter, I realized that the sippy cup leash needed an upgrade. The velcro on the old one was finicky and didn't stick as well after a while.......especially if the sippy cup was completely full and heavy. (Sorry if you made one and had the same trouble...)
Anyway, I created a new one for our long trip cross-country 9 months ago, eliminating the task of retrieving dropped/tossed sippy cups from little hands back in their car seats. And there the leashes have stayed. Permanently.
And I never shared my newest upgrade. Until now.
It hasn't been a secret, I just kept forgetting to share.
I now make them with elastic. And with this style of sippy cup (from Gerber, found at Walmart) the elastic keeps them perfectly in place.
And oops, if the sippies take a tumble, they won't go far.
And they attach simply to any sort of bar or strap.....by simply pulling the elastic portion through the loop at the other end.
Then pull tight to secure the sippy cup leash in place.
Our leashes spend most of the time in the car, attached to the car seats.
Then I just remove the sippy cups and wash them as needed. The kiddos love having water in the car anytime they want it. Works for us.
(I just made these new ones to show the actual process but the previous ones spent every day attached to car seats for the past 9 months. And were still working great.)
Would you like to revamp yours?
Or create some for the first time?
I started with a piece of ribbon that was 28 inches and a piece of sturdy elastic that was 9 inches.
Then I heat sealed the ends of the ribbon and elastic. Don't hold it on there long enough to catch fire.....only long enough to melt the edges and keep them from fraying.
Then measure how much of an elastic loop you'll need to keep the cup securely in place but also to be able to still slip the cup in and out of the loop. I needed a loop that was about 6 inches around so I pinched my fingers there.........
.......then attached it to one end of the ribbon, overlapping about 1 1/2 inches. I made several seams to secure the elastic to the ribbon.
At the other end of the ribbon, I tucked under the end about a 1/4 inch, then folded it over 3 1/2 inches....creating a loop. Again, I made several seams to secure the loop into place.
Then I slid the leash right onto the sippy cup.
Perfect fit.
And really, a much better version than the last one.
Give it a try.
**Alteration for different sippy cup shape:
My sippy cups work great for these elastic style of sippy cup leashes. If your sippy cups are straight and not contoured, try adding small pieces shelf lining like I did with the last sippy cup leash version, found here. But place little pieces of the shelf liner along the inside of the elastic loop (before sewing it into a loop) about every inch. The tackiness of the shelf liner, along with the tightness of the elastic, should keep the sippy cup leash in place......even on straight sippy cups. This technique just wasn't necessary for mine.Good luck!
Saturday, March 5, 2011
Baby blanket and hats (knit fabric)
Okay, part 2 is here.
Did you see the knit baby blanket tutorial yesterday (found here)?
Well, here is a great way to complete a little baby set.......by adding a simple,
yet cozy, knit baby hat. Or, hmmmm, maybe 3!
The hats are made from cotton interlock knit.....so they are perfectly stretchy and comfy.
And while making one,why not make a couple more?
And don't forget the fluffy little knit flowers. Yummy, right?
If you're making these for boys, you could applique a shape or a name right there on the front too. Just as cute.
But those girls, they need some flowers!
Did you make the blanket from yesterday already?
Or at least buy/order some knit?
If not, hurry it up.........you'll love how both of these projects turn out.
.
Ready to make some little knit hats?
.
.
Before getting started, keep in mind......that the shape of these hats are one dimensional. But because they are knit, they will stretch and the proper hat shape will form as you slide them over those little baby heads. So while making your own size, remember to make them smaller than the actual head so that they will stretch and the side seam won't look like a side seam across the top of their head. Make sense?
. . . . .
As mentioned in the baby blanket tutorial from yesterday, I found my knit here. But the colors I selected are gone. (So in case you want to search for it elsewhere, the fabric is Michael Miller Interlock Knit. Designer: Patty Young.)
As mentioned in the baby blanket tutorial from yesterday, I found my knit here. But the colors I selected are gone. (So in case you want to search for it elsewhere, the fabric is Michael Miller Interlock Knit. Designer: Patty Young.)
First, I pre-washed my knit. (Why prewash? Read this post.) Then, I used an old knit hat from when my little girl was a tiny baby, as a pattern. I placed the hat on top of 2 layers of the knit and cut around it, adding a 1/4 inch on all sides. (But the height from top to bottom isn't as tall as this entire hat. If you look at a knit hat like this from the inside, the main hat section doesn't go all the way down to the bottom. The fold creates some of the height. The finished hat is about 5 inches tall.......but the main hat section is only about 4 of those 5 inches. You'll understand what I'm talking about later on in this tutorial.)
I made my hats a size 0-3.......and are assuming they'll fit just fine. I patterned them after the light pink hat shown above, which is a Carters hat, size 0-3 months. So hopefully they will fit just fine a few weeks after she's born......and will still fit for a few months. The knit will allow for some great stretch, so I'm not too worried.
**If any of you are interested in the size 0-3 months, here is a sketch of the pattern I used. I didn't include the outline of the bottom fold of the hat because it's just a rectangle. And the circles are for the flowers later on. But click on the image below, save it to your computer, copy and paste it to a document with the margins set to zero, and print it out. I shared the dimensions below, so that you can verify if your printer is printing it out at the right size. But keep in mind, this was a quick sketch, and is imperfect. I just thought it would help to use as a guide. (You'll have to adjust for making smaller or bigger hats.) And please don't use this to sell hats or the pattern. This is for personal use only. Thanks!
So next, I cut out 2 of the main hat pieces and then cut a rectangle piece that was 5 1/2 inches x 14 1/2 inches.
**Make sure that the stretch of the knit is going left to right......so if you hold the pieces below on the left side and right side and pull apart, the pieces will stretch. It doesn't need to stretch top to bottom. This will give the hat the proper fit on the head.**
Next, place the 2 hat pieces right sides together, and sew along the top curved edge, using a 1/4 inch seam allowance. Then fold the rectangle in half with right sides together and sew the two 5 1/2 inch ends together.
**I used a serger but you can still do this project with a regular sewing machine. Try using a zig-zag stitch (or check out this stitch here) and make sure to always lift and adjust your presser foot, to make sure you are not pulling or stretching your fabric too much. Then iron/steam your seams to shrink the knit back up.
Then, fold the tube in half down inside itself, creating a more narrow tube, with the right side of the fabric facing out.
Then slide the tube down inside of the main hat piece (which is still inside out), with the raw edges lined up with the raw edges of the hat.
Pin the 3 raw edges together, all the way around the bottom of the hat.
Then zig-zag or serge in place.
Next, turn the hat right side out, and slide your iron inside of the hat the iron that seam upwards, along with pressing that bottom fold flat. Then rotate the hat and continue pressing that seam upwards and the fold flat.
And since we're talking about ironing/steaming, I always, always, always steam/iron my knit........which kind of shrinks the knit back into place after sewing. Even after a plain old seam like the ones above. (Keep in mind, you don't want to iron like you do with a wrinkly cotton and pull your hot iron across your fabric. You just want to place the iron down and let the steam shrink it up. Then move the iron and repeat.)
Next, fold up the bottom of the hat about 1 1/2 inches (maybe a tad more) and iron the fold in place.
Then I used a needle in thread to tack the fold in place, along both side seams of the hat. (Need help with hand-stitching? Click here.)
Onto the flowers.
If you're using the pattern pieces from above, cut out 5 knit flowers from the larger circle and 4 knit circles from the smaller circle.
Start with your bigger circles and fold them in half, and then in half again.
Arragen 4 of them on top of the fifth circle, creating one full circle of folded circles.
Now, either hand stitch those little corners in the center to the base piece, or use your sewing machine. Be careful if using your sewing machine, to not pull the fabric too much. You want to keep the pieces in a circle shape.
Then fold your 4 smaller circles the same way and place them on top of the larger circles. But offset them a bit, so the folds aren't lined up exactly.
Stitch the centers in place the same way as you did above, but sew a little further out this time......to help keep the petals down a bit. (Sew through all of the layers while attaching these top circles.)
Then attach the flower right to the brim of the hat with a needle and thread, making sure to make several stitches to secure the flower to the hat.
And that's it.
Now make a few more. Keep some. Gift some. Enjoy them all.

Subscribe to:
Posts (Atom)


