Showing posts with label Crafts. Show all posts

Saturday, May 21, 2011

How to make your own chalk board paint


Aloha!

Today I'm going to teach you how to make your very own chalkboard paint. FROM SCRATCH! Yep, I first learned the secret ingredient from the craft queen herself via her Martha Stewart Living Magazine.  In their version, they used a flat paint like you would purchase in the paint section at a hardware store, but I really just wanted a smaller quantity to do a few Honeysuckle accents around my house and for Valentine's gifts, so I thought I'd do some experimenting on my own with regular old acrylic craft paints and different proportions. 

Here's what you will need:
Dry Non-Sanded Grout (purchased this huge tin at our local City Mill hardware store for $1.50...this will probably last me forever)
Acrylic craft paints - White, Black, and Bright Magenta (Apple Barrel line by Plaid, found at Wal-mart)
NOTE: Our craft stores here on the island are somewhat lacking, so I wasn't able to find anything perfectly matching Honeysuckle. I will give you my "formula" with those combined colors.
Measuring spoons and cups
Mixing cup or bowl
Paint brush or stick to stir


Step 1) Measure 1.5 teaspoons of the non-sanded grout and put in your mixing cup (this is very dusty, so please do this in a well-ventilated area).


Step 2) Pour in 1/4 C. of the  Pepto Bismol   Bright Magenta craft paint.


Step 3) Add 1.5 teaspoons of white acrylic craft paint.


At that point, I really liked the color, but I was going for perfection, and I had the Pantone website up and was trying my very best to match what I saw on the screen. I could tell I needed to mute it slightly with some black.

Step 4)  Add 1/8 teaspoon black acrylic craft paint.


Step 5) Stir for a couple minutes with a cheap paintbrush or stick.


(I'm not really left-handed, but I stink at taking pics with my left hand! ha)

This next pic is to show you that the consistency WILL BE SLIGHTLY LUMPY still. The grout is very fine, so when you brush it on, it spreads right out and isn't noticable at all.


Step 6) Apply it with a sponge brush.


(Hey, look! I took a pic with my left hand!)

You will need between 1 and 3 coats depending on your medium. For my wooden calendar, I used 3 coats on top of a piece of 1/8" MDF (I primed with Zinsser water-based primer).

As with any chalkboard paint, you will need to prep the surface once it is completely dry by rubbing a piece of chalk across the entire board (easiest if you turn the chalk on its side). Then erase completely, and it's ready to go!


I also used it on some cardboard cereal boxes and made chalkboard Chinese take-out boxes. I've been planning to do this for my daughter to take to school as gifts and was excited to have some Honeysuckle to use!

This time I only did one layer, and I did not prime it. I just cut the box and painted directly on the inside with the chalkboard paint. Then I used the Chinese take-out box pattern I designed and cut it out.


So with that one bowl of Honeysuckle, I covered a 28"x18" board x 3 coats, and a 12"x15" cardboard box x 3! Total cost for this chalkboard paint project is about $.35.  I can handle that.  :)

This opens up SO many new chalkboard color possibilities! I'd love to hear what you're chalking up!

Aloha,
Charlie

Update: I was asked how long I let each coat dry since the spray paint chalkboard stuff says to let it dry one day between coats. Truth-be-told, I'm super impatient, and I was in a rush! I painted each layer, then used my blow dryer to dry it until it was really dry to sight and touch. Seriously dries really fast! Just like any old acrylic paint project! Yet another advantage to DIY'ing!  Sweet. ;)

Thursday, May 27, 2010

Porch Sign


While Daddy's Away, Mommy Will Play

So my husband is gone for the next two weeks, which means two weeks of crafting and projects without feeling guilty!  It was finally a nice warm day today, so the girls and I headed to Ace for materials for today's project.  We made it through the store quickly and with no drama!  And we came home with this.
 2x2, 1x6, 1x4, 4x4

I had seen a really neat tutorial here to make your own candle sticks and I had seen a tutorial here to make candle stick hangers at Drab to Fab.  I loved the candle sticks but didn't trust my kiddos not to touch in the house (4x4's are heavy) so I decided to combine the 2 and make something for my front step.


I cut my 4x4 24" long.  I cut my 1x6 down to make 2 5 1/2"x5 1/2" squares and 2 4 1/2"x 4 1/2" square.


I stacked the 4 1/2" square on top of the 5 1/2 square and screwed the 2 together from the bottom.  I then attached it to the 4x4, flipped it over and repeated.  After this step you want to make sure everything is square.  The girls helped to make sure it was nice and sturdy.


I gave it a quick coat of spray primer and then a light coat of heirloom white along the edges.  When it was dry 2 minutes later (ha ha, I 'm surprised anything I do turns out because I don't have the patience to wait the recommended time) I gave it multiple coats of flat black spray paint.


Once the black was dry 15 minutes later I used my sanding sponge to distress the edges.


I bought the cheapest hook I could find and sprayed it ORB.  While I waited for this to dry, yes I actually gave it 15 minutes I went in the house to make my sign.  I used the 1x4 I bought and cut it to 11", sprayed it heirloom white, sanded the edges and then inked it with an ink pad.


I used my cricut to cut the vinyl, slapped it on, drilled 2 holes at the top and used beading wire for the hanger.


I have already decided to make some different signs to hang for the different seasons, but for now Welcome will do.


Monday, May 10, 2010

Chalkboard Canning Jars

I love my canning jars. I started using them for most of my food storage, from bulk items to leftovers - primarily because I think it looks so cute. Sometimes, though, the contents of my jars become a bit of a mystery. They hide in the back of my fridge or pantry for a bit and when I finally re-discover them, I think, "hmmmmmmm... maybe it's.... no, I have no idea." I was cleaning up in my laundry room and found a can of chalkboard spray paint and thought I would go ahead and spray the tops of my canning lids (I don't know that this idea would work for actual canning, though).
DSC_1260
I already keep a little container of chalk in my kitchen for our little chalkboard in there, so it has proved very handy to just write the contents on the tops. And today, for lunch, I heated up potato soup, not homemade yogurt.

Monday, March 15, 2010

Wood Alphabet Squares

From: How Does She

IMG_5668

ABC’s with Vinyl

Yea!!! I’m excited how this project turned out!!!.  I needed something for my little guy’s room.  I’ve seen the canvas with the ABC’s and thought they were really cute, but I can’t paint…so Vinyl to the rescue!!!
So here we go with the tutorial:IMG_5665
1. For the top piece cut a 1×6 into a square (it will be about 5.5×5.5).  You can use pine or mdf.  It doesn’t matter:)  You can get both at the hardware store.
2.  For the bottom piece cut a 1/4 inch mdf into 7×7’s.  If you don’t have a table saw just use 1×8 pine or mdf and cut it with your{{or your neighbors}} chop saw.  Make sure they are  square.
3.  Paint the bottom piece dark brown{{or whatever color}}
4.  Mod Podge the top piece (10 steps for perfect mod podging)
5.  Sand
6.  Stain
IMG_5659
7.  Attach the top to the bottom.  You can use wood glue and it will work the same.  I’m a little impatient and wanted it done fast so I pulled out the nail gun!
IMG_56608.  I had my husband router the key hole in the back. {{I was tired and he was willing to help…yeppee!!}}  If you don’t have a router just use picture hooks.
IMG_5656
9.  Apply your vinyl.  I used different fonts and even put some cute pictures mixed in.  This is were your own cutter comes in handy!!!  If you have a Cricut or other cutter and need strips of vinyl HowDoesShe recommendsexpressionvinyl.com. If you don’t want to mess with cutting your own vinyl MyTalkingWalls is who HowDoesShe recommends!  They are both great to work with and have amazing prices.  Also if you need more info on vinyl click here for vinyl 101.
IMG_5649
10.  Hang on the wall.  Yep we put 26 holes in the walls, but it was sure worth it!
IMG_566911.  And yes my husband helped me hang them because I don’t always hang things straight:){{or as he would say ‘never’ hang things straight}  We need a tutorial on hanging pictures…Missy get on that!!
Need more ideas on a boy’s room?  Check out Shelley’s post on ‘Toddler Boy Room on a Budget’

Block Chore Chart


chore-chart-013
Are you ready for this?…
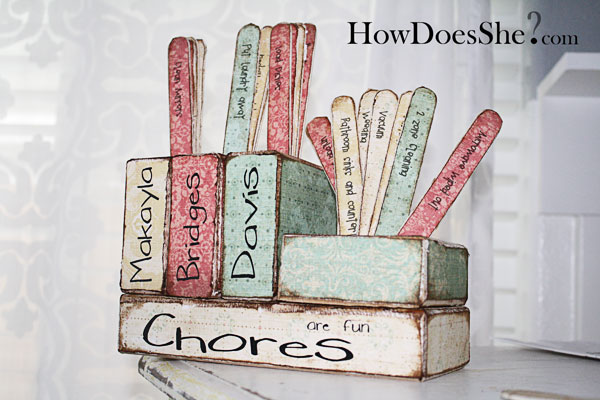
This is going to be the LONGEST tutorial you’ve probably ever seen, but don’t fret…it’s going to be worth it!  An organized classy chore chart is headed your way.  Can you even guess what this chore chart for multiple kids is made out of??? Yep, 2×4’s … another 2×4 decor idea.  I LOVE how this turned out because I can leave it on my counter and it matches my home decor.
We’ve included a free pdf template for the chores too! chore-chart-001
It also has a subliminal message for my kids to read all week, “Chores are fun”…one day they will agree…
If you missed the ever exciting tutorial on how to use a miter saw you are in luck…I just posted it earlier today.  Check it out..it really is a fun read:)
Okay, on with the show:

Chore Chart for Multiple Kids

I cut with the miter saw 5 blocks of wood
4 of them were 3.5 x3.5 squares
1 of them was 8 inches long

Chore-Chart-for-multiple-14I drilled one hole into the top of each of the 3.5 by 3.5 blocks.  Do you like my band-aids?  I was so glad this shot really brought out the 3 band-aids that I was lucky enough to be wearing during the making of this craft.  Anyway, I used a 7/8 bit (as shown in the picture…nice shot Missy) and started drilling.
Chore-Chart-for-multiple-13I ended up sandwiching the block I was drilling in-between 2 others just so I didn’t end up with more band-aids.  A clamp would work well too!  Ya, I’ll tell you in a minute why I have so many band-aids…
Chore-Chart-for-multiple-12Then I had to put a little shoulder into it because I hit a knot and I had to make it work.  Really…most of the time you don’t have to lean into it as much…I guess I’m a tad weak and needed a little oomph to get through that knot.
Chore-Chart-for-multiple-11I finished the 3 holes in the three 3.5×3.5’s (there is a picture below).
The next hole I needed to make was a bigger one.  I used a longer 2×4 because a small piece would have just spun and no hole would have been created.  I was using a 2 inch bit for this one.
Chore-Chart-for-multiple-10Here is an action shot.  Look at the wood shavings fly…O and do you like my slippers:)
Chore-Chart-for-multiple-9My bit wasn’t long enough to go through width of the 2×4 so I used my drill bit and made a hole to go through the entire board so when I flipped it over I knew where to place the 2 inch bit.
Chore-Chart-for-multiple-8I flipped the 2×4 over and am sticking the 2 inch bit into the hole I just drilled.  Giving me a guide to match up the bottom and the top.  Keep reading…it gets better.
My bandaid story:  I was making a sign for a friend and I was in a hurry and the drill bit wasn’t in the entire way.  It slipped and caused me to wear band-aids.    I wish I had some cool life saving story, but really it’s just me being in a hurry with a tool…I’m glad it wasn’t the miter saw:)  Tools are great, but you have to be careful.  O, I sound like my mother!  I’ve been working with power tools for over 3 years and I think this is the worst of the injuries.  I get hurt worse using knives in the kitchen…I will leave the cooking posts to Shelley!  Really just be careful and you’ll be okay!
Chore-Chart-for-multiple-7AHHHHHH…it worked.  Honestly I didn’t know if it would work, but it did.   YEA!
Chore-Chart-for-multiple-6I had to add this picture of my little guy.  And don’t worry I don’t let him out to play with the saws.  He had been sleeping (hence the bed head)but as soon as he was up, he wanted to see what was happening.  Look at his chipmunk cheeks…LOVE it!
Chore-Chart-for-multiple-5Okay here is the top shot.
THREE  3.5×3.5 inch boards with a 7/8 inch drilled down a little over half way.
One 3.5×3.5 with a 2 inch hole drilled through the center.
One 3.5×8 inch block under all of the above 4 blocks.
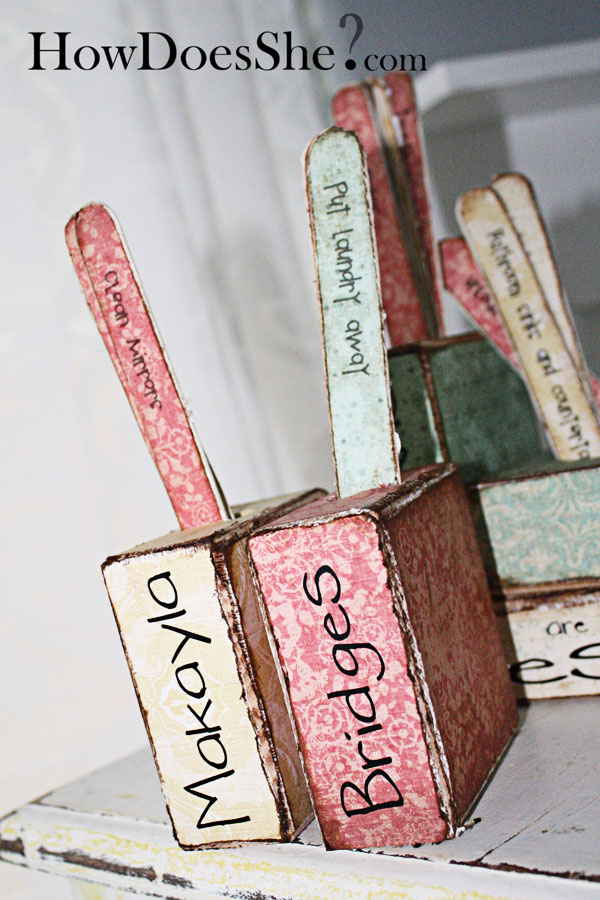
Chore-Chart-for-multiple-4Mod podge the paper on.  I used an amazingly sophisticated tool to cut a hole into the paper so the Popsicle sticks could fit down into it…a Hannah Montana pencil.
I sanded the blocks and stained the edges.  For more exciting steps on perfect mod podging you can find it in our 10 steps to perfect mod podging.
Apply the vinyl (your kids’ names and chores are fun).  I used the Silhouette to cut the black vinyl for this project.  If you need vinyl or a vinyl lady check out our vinyl 101.
chore-chart-018You can thank Missy for figuring out how to make a template for the Popsicle sticks (they are for the thicker ones, like tongue depressors).  There are 4 sheets and they are color coded.  Why color coded?  I was invited to go to a class a couple weeks ago on the topic of a ‘house of order’ by an amazing lady named Julie.  After her class, I felt pumped up about house cleaning, dejunking, and doing laundry (really…).
I always have felt chores were ‘another thing’ to do on my list of ‘to do’s’ that never were crossed off because there was always something else to clean.
She gave a whole new perspective on house cleaning.  She said she felt blessed when she did chores.  She was happy to do laundry because it was another way she showed love to her family.  She was happy to do it because she had a washer and dryer to make it easier.   We are hoping to get her to do a post for us (hint…hint).    I really have never heard someone so positive on cleaning and household chores.
Anyway, back to the color coding.  She divides her chores up into how long they take…how long they ’should’ take:)  Then, when assigning chores, the kids get to choose 2 two minute chores, 2 five minute chores and so on until all the chores are divided up evenly.
So, we put it into an easy format for you just to print them off on colored paper and easily attach them to Popsicle sticks.
All the 15 minute chores are on one sheet and I printed them on cream paper
The 10 minute chores are Yellow
The 5 minute chores are Red
The 2 minute chores are Green
CLICK HERE FOR YOUR FREE PDF CHORE CHART TEMPLATE
Chore-Chart-for-multiple-3
After I printed them out I mod podged them onto the Popsicle sticks.Chore-Chart-for-multiple-2I sanded them down and then stained the edges.  Next time I need to wipe my table off before I take a picture.  The crumbs are from blueberry muffins during snack time!
chore-chart-016The kids get to choose.  I will sometimes cover the chore name so they ‘blindly’ get their assignments.
Chore-Chart-for-multiple-1
They get their own block, put their chores in it and get to work.  Some of you will notice Davis’ chores…he’s two and can’t wipe out the microwave, but I had to make him one so when he can he will be given the opportunity one day:)
Chore-Chart-for-multiple-kiWhen they are finished with their chore, the Popsicle stick goes back into home base!  It helps them keep track of what they’ve done and what they need to do.  Also, it’s helped me because I know what chores to check up on to make sure they’ve been completed.  I started making this as a gift for someone, but I liked it so much I decided to keep it!  Another cool thing…it was super cheap…’thrifty’ to make!
And one more shot of it because there are so many wonderful pictures in this post that I didn’t want you to forget what the final project looked like!
chore-chart-001
We are participating in Skiptomylou’s Made By You Monday Link Up Thanks Cindy! :)