Tuesday, May 25, 2010

Coffee Table to Bench Seat


MONDAY, MAY 24, 2010

I hope by now that you all know how much I love when a project that involves re-imagining and reusing something that we already have.  So,, when I saw this project I had to ask if I could share it. Jenni from Peppertowne did a fabulous job with an old coffee table, check it out:


Confession:  I lost the 'before' picture for this project.

I swear I took the pic.  But where is it?
I've search through the endless piles of photo chaos on my computer.  Oh, don't judge me.  You know the photo chaos...you've been lost in it too. 
The abyss of unmarked photos scattered all over your computer.  

Promise: I promise to save my pictures in a marked and uber-organized way.  At lease until I'm in a hurry or the cheese quesadillas are burning...

Craigslist rules!  I found a photo similar to the coffee table I originally bought.
My coffee table cost me $10 bucks.  But, I needed a window seat!  
I was looking something with modern lines and a neutral feel.

TAA-DAA!!


This was an easy project with some basic upholstery. 

Step #1: Prep and paint the wood frame.
After removing the lovely smoke mirrored glass, I painted the table and then sanded up the edges a bit to let the dark wood show through.

Step #2: Cut some wood board to replace the glass mirrors. 

Step #3: Cut a piece of foam for the bench seat.  The best way to cut foam is a band saw.  But if you don't have one, the second best way is with a sereded kitchen knife.
Glue the foam to the board using spray adhesive.


Step #4: Using a staple gun, cover the foam with a liner cloth. 
Securely staple on the backside of the board.  Use a firm even pressure around the edges.  As you can see in the picture, I use my body weight to push foam in and then staple the fabric.  This makes a nice rounded edge on your seat. 


Step #5: Cover your seat with the upholstery fabric.
Using the same technique as the liner cloth, use a firm even pressure and staple the fabric in place.  Always cut away and excess fabric.  Pull your corners in and staple them like crazy. Remember, the underside of your project doesn't have to look perfect.  This is not an art of perfection...and that's why I love it!  Also, I'm using an air powered staple gun, which is the bomb.  If you don't have access to one of these, a hand powered gun is great.  I've done many many project with a hand gun.
Step #6: Staple your trim.
Adding a trim gives finished look to your project.  Here I choose a burlap natural fiber that fit in with my neutral scheme.  Simply, staple the trim along the edge of your board. 
 
Here's a trick I learned from a great upholsterer, when the two ends of your trim meet, simply unravel the ends, cross them over each other and staple in place on the underside of the board. This way your cushion will fit perfectly without the added bulk of the extra trim.


 Step #7: Put your bench together.
Add a few L brackets to secure your seat.

That's it!
Enjoy your bench!


Isn't it lovely! 
 I love the fabric, I love the color and the slight distressing, 
I really love it all!


Read more: http://www.remodelaholic.com/#ixzz0oxfzu6Vb

Sunday, May 23, 2010

Crayon Roll


guest blogger: lindsey of pleated poppy


hello! i'm lindsey from the pleated poppy.

by day i'm a mom to 3 littles and a part time home schooler.

by night i'm a blogger and shop keeper, working away into the wee hours in my little sweat shop.

i have a deep love for all things fabric: drooling over it online, buying, sewing, organizing, pairing up favorites. i am really thankful that my business allows me the excuse to buy all the fabric i want!


one of the long time staples in my shop has been crayon rolls.

these are perfect for gifts!
each of my girls have one and silas (2 1/2) has been begging for one, so i made up this adorable one for him. these are great for throwing in your purse, for keeping the littles busy in the car, waiting rooms, restaurants... and when they're done, they love that each crayon has its own little home

and they can roll it up themselves and secure it with the elastic.
so, are you ready for the tutorial? here you go!

supplies:

2 pieces of same fabric for outside and inside - 5" x 16 1/2"


1 piece of coordinating fabric for pocket - 6" x 16 1/2"


1 piece of flannel for lining - 5" x 16 1/2"


1 coordinating hair elastic


1 button


needle and thread


1 box of 16 crayons (i get mine at walmart)


disappearing ink fabric marker


1. cut out all 4 pieces of fabric


2. fold pocket piece of fabric in half length-wise and iron flat.


i have found that it helps to actually PLUG IN the iron, and not the nearby vacuum cord.


crazy how that works!


3. lay out flannel piece.


its just a lining to give the roll a little more stability.


then lay one of the 5" wide pieces on top of the flannel (wrong side down),


then pocket piece on top of that, lining up all bottom edges.


pin at the ends.


4. find the midpoint of the pocket at 8 1/4".


with your fabric marker and a straight edge, mark the middle line.


5. then make a line every inch, until all 15 lines have been drawn.


see how the space after the last lines on each side is a little wider than 1 inch?


that's to allow for the seam allowance.


6. now stitch down the pocket.


i start at the center line, 1/4" below the top of the pocket, and back stitch (very important!),


then run your stitch all the way down.


work your way down the lines to the right, then to the left, until all lines are stitched down.


trim threads.


7. if you have a tag to add, do it now.


also stitch down the elastic on the far right side.


i take the seam part of the elastic (where its melted together) and pinch it.


i stitch it down just inside the edge, about a 147 times.


ok, not really but i really want to make sure the elastic holds when little hands are tugging on it.


8. now lay the outside piece on top of all that you have just attached together,


right sides together, and pin at each corner.


9. next stitch all pieces together with a 1/4" inseam.


start at the short end without the elastic, leaving about a 2" opening to turn right side out.


i marked my opening so you could see my placement.


clip the corners.


10. turn right side out and gently poke out corners. i like to use a chopstick for this.


11. spray your stitched down pocket lines with water before ironing crayon roll flat.


sometimes if you don't spray the marker lines,


when you iron it it makes the ink permanent rather than disappearing.


12. press all the edges flat and tuck in the edges of the opening.


13. starting just below the elastic, stitch very close to the outer edge to hold all the pieces together.


14. organize your crayons (my *favorite* part!) and tuck into pockets.


15. roll up tight.


gently stretch the elastic to find where the button should be sewn down.


sew on the button securely.


16. you're done!


find a cute little one to give this to and make their day!


i so hope you enjoy this little project!


as a thank you for reading through this very long tutorial,

use the code VANDCO for 15% off your order in my shop!

thanks vanessa, for inviting me over!

-lindsey

wow thanks lindsey! that's fantastic! okay well one more day and i should be on my way home from the wonderful world of fabric and patterns and designers. i hope i'm not in some corner rocking back and forth repeating in muttering words: "i'm not worthy i'm not worthy."
but knowing myself...yup someone check the corners.
we'll talk soon, have a nice rest of the weekend and i hope to see you on monday.

Saturday, May 15, 2010

Painting Furniture-Step by Step


Painting Furniture-Step by Step


How to Paint Furniture: I've received so many questions about painting furniture that I decided to write up a step by step guide to share with you. I'm sure there are many different ways to paint furniture but this is how my dad taught me. Below are a few of the pieces I have painted so you can see the "before and afters". The instructions are at the bottom of this post.


After

This bed was free on craigslist.org I was the second person to call on it but I left my name/number just in case the first person didn't show up. He showed up but when he saw how bad of shape it was in he didn't want it. It had someone's initials carved in it but nothing a little sanding couldn't fix.


After


After


After

Painting furniture


Stripping: I almost always strip my furniture before I paint it. Another option would be to sand it really well. You don’t want any clear finish or wax on it or the paint will scrape right off. I use Jasco paint stripper. It comes in a can and I think you should be able to find it at most hardware stores. Follow the directions on the can and make sure you have long sleeves and pants, shoes, and safety glasses or goggles on. Trust me on this one…I was using this wearing flip-flops and got just a speck of it on the top of my foot….Ouch, it feels likes it's burning a hole through your skin…actually it probably is. You can use a wire brush to get into crevices. I buy the small disposable wire brushes at the hardware store (they are shaped like a toothbrush).

Prepping: Before you paint, wipe the piece down to remove all the stripper and sand it lightly. I like to use the 3M sponge sanders. Wipe down again after sanding.

Adding appliqués: If you would like to add appliqués now is the time. You can see on the picture of my bed that I added a cherub/swag appliqué. There are a number of places you can buy them. One is Do It Youself Chic and another is The Shabby Suite. Update: I've been purchasing some lately at The Bella Cottage. Click on either one of those to go to their website.

Primer: Some pieces I primed first and others I didn’t. If the wood still has stain that was not removed completely from stripping and sanding it, I would prime it for sure. Make sure you get a primer that also says "sealer", this will seal the stain so it doesn't bleed through your paint. Some pieces of furniture will need two coats of primer to seal the stain.

Paint: I use regular latex indoor house paint. I’ve used flat and eggshell, it doesn’t really matter, in the end they look the same. I use a soft white, not pure stark white but any color will do. Just brush it on following the grain of the wood. Let it dry and if needed add a second coat. I wait about a week before I go on to the next step (If you're in a hurry you can probably wait 48 hours and be fine). Latex paint it will be gummy if you try to sand it before it’s really had time to cure. Warning...It’s going to look really bad at this point, it will be very flat and chalky looking, especially if you used flat latex but trust me it will look good in the end after you put the paste wax on.

Sanding and distressing: I lightly sand the whole painted piece with very fine sand paper. This really smoothes out the latex paint. On the edges I sand through to the wood to give it a distressed look. You want to do this in areas where the piece would normally wear over time, like on the edges. If you want a more distressed look you can take a large chain and hit it on the wood to leave dents…I don’t do this but I’ve seen my dad do it on his pieces.

Adding accent colors:
 This is optional but on some pieces you may want to add another color to bring out the details of the piece. There are two ways to do this. The first is to buy some brown craft paint (umber or sienna colors) and dilute with a little water to make a wash. Use a rag to wipe the wash over the area you would like to “antique” and then lightly wipe away the excess. If you’ve added too much you can remove some of it with a wet rag. I used this technique on the cherub swag appliqué on my bed. The second option is to use “Rub n Buff” which is available at most hobby stores. It comes in many different colors. Put a little on your finger and lightly rub over the piece where you want to add color. The difference between these two options is that the first one gets down into the crevices and the second one goes on the high spots. You can even use both of these together.

Waxing: I use a paste wax instead of a clear coat. I use Howard Citrus Shield Premium Natural Paste Wax. Make sure you get Natural color because it comes in different wood tones also. The wax does make the furniture a little more yellow but it's very light. Follow the directions on the can…you rub it on and buff it out. It takes a few coats of this to give it a nice luster. To keep up the wax finish I occasionally use another Howard product called Feed-N-Wax. Both these products can be found in most hardware stores. (look in the area where they have the wood refinishing products NOT in the cleaning department where you will find furniture polish)

That's it! I hope I didn't leave anything out. Please feel free to leave a message or email me if something isn't clear.

Friday, May 14, 2010

Curtains from a Bed Sheet


Tutorial: DIY Curtains from a Bed Sheet

12 Comments
Before and Afterdining roomtutorial
* UPDATE – Comments are working again!  Thanks hubby :)  Let the comments fly! *
Wow!  I did not intend on being away for so long, but Stephen and I both came down with strep throat on Monday and we’ve been out for the count!
Luckily I was able to make a decision and attack our dining room curtains since the last time I posted.  THANK YOU to everyone who weighed in on our Dining Room Curtain Dilemma last week.  You ladies have such good ideas and really got me thinking on other ways to improve our space.
So, without further ado, the winning curtain fabric was….
The green floral print!
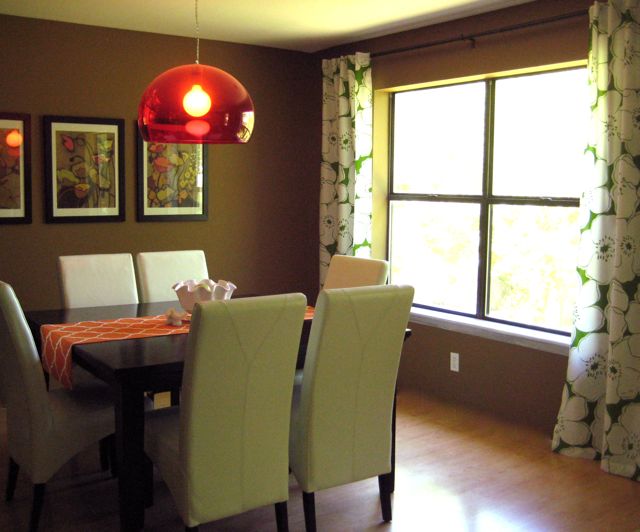
The vote was pretty evenly split, but we just couldn’t stop ourselves from loving this fun springy floral, especially for this time of year.  The best part is these were made from a $10 set of sheets and I still have fabric left over to use for our kitchen window treatment!  SCORE :)
Here’s a little tutorial I whipped up to show how I made these curtains from a flat sheet.  It really couldn’t have been simpler and took practically no time at all!
Tutorial: Turning a Flat Sheet into Two Curtains
Supplies:
1 flat sheet, full size
scissors
iron
sewing machine & thread (or an iron & hem tape)
glue gun
2″ wide white ribbon
Step 1:
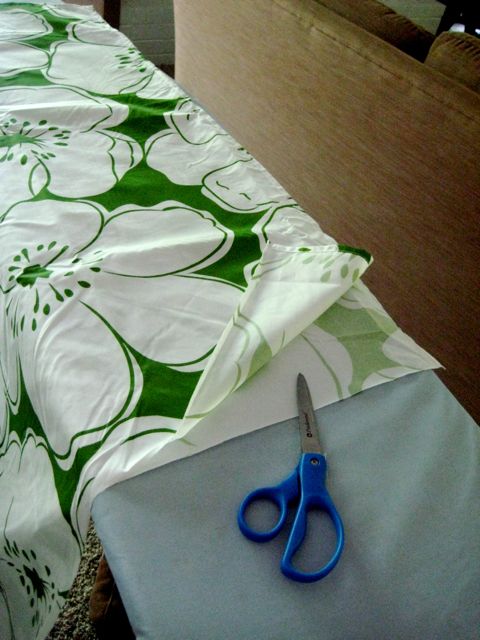
Fold your flat sheet in half lengthwise, and cut along the fold.
You will end up with 2 panels, each as long as the original sheet.
If your panel is long enough you can fold over the edge you see here to make a pocket for your curtain rod.  I didn’t have enough length to do that, but you could – I’m just sayin’.
Step 2:
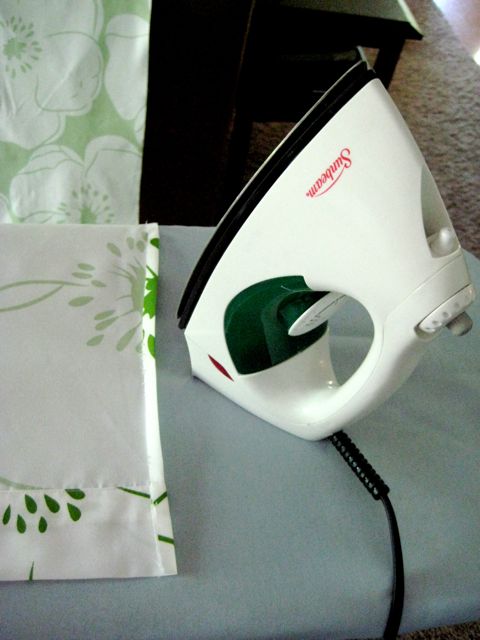
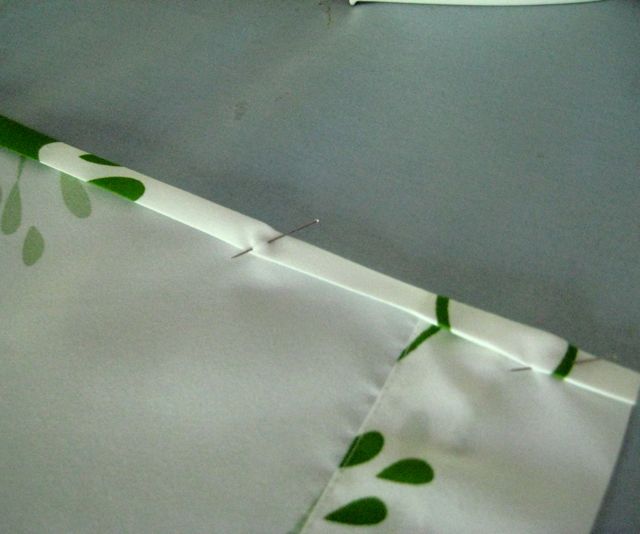
Iron both panels.  Then, fold over the edge you just cut 2 times and iron flat.
This is the edge you will sew to keep the fabric from fraying.
For a NO SEW version, you could also iron this hem down with hem tape.
Step 3:
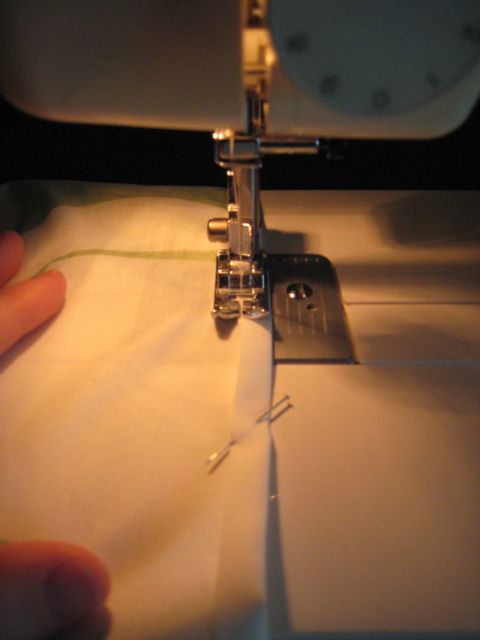
Sew your hem.
Step 4:
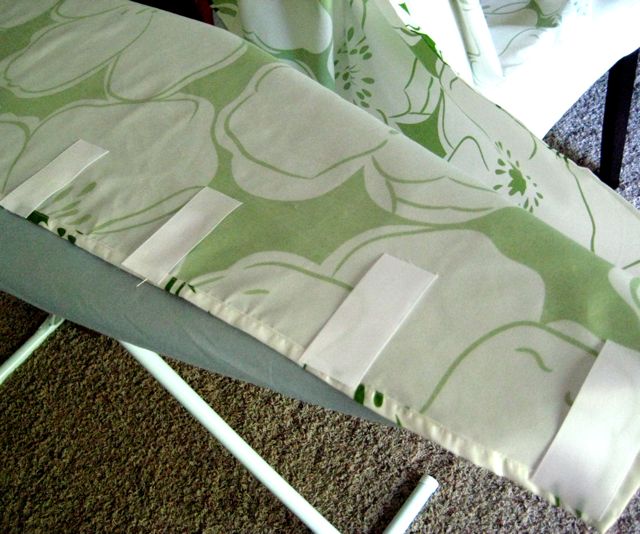
Cut 6 strips from your ribbon, approximately 3.5″ long, and lay them evenly across the top of your panel.
These will be the tabs for the back of your curtain.  You may need more or fewer, depending on how wide your curtain is.  You can also make your ribbon strips longer, depending on how thick your curtain rod is.
Step 5:
Hot glue the top and bottom of the ribbon strips to the panel.
I decided to glue the bottom of mine 3″ from the top of the strip to make them a little more “loopy.”
Step 6:
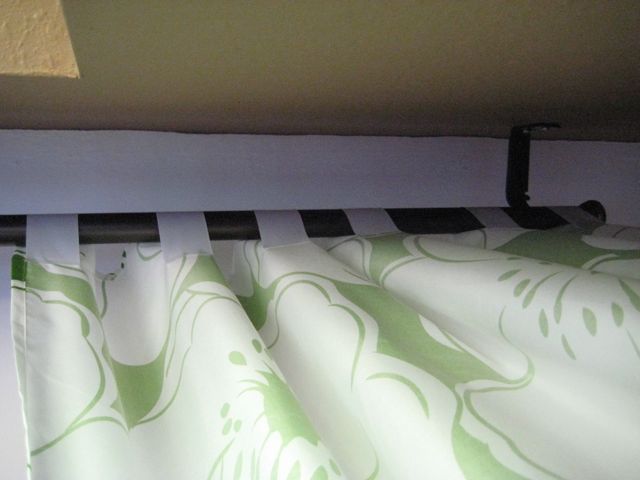
Hang your new curtains (preferably on a SWEET $10 curtain rod from Big Lots – Ok, ok I love you again, Big Lots)
Here’s a view of what those ribbon tabs look like from the back:
And finally, the finished product!
What do you think?  Easy, right?
Thanks again to all who offered advice on these babies.  Quite a few of you suggested we keep the drop cloths for a more winter-y alternative, which we plan on doing.  I’ll also be on the lookout for some art or photos to replace our dark art on the far wall.  Any suggestions? I’m thinking thicker white mats to start…
Also, I may be crazy, but I’m just DYING to paint this room white.
Stephen’s response?
“You paint everything white!”

Monday, May 10, 2010

Chalkboard Canning Jars

I love my canning jars. I started using them for most of my food storage, from bulk items to leftovers - primarily because I think it looks so cute. Sometimes, though, the contents of my jars become a bit of a mystery. They hide in the back of my fridge or pantry for a bit and when I finally re-discover them, I think, "hmmmmmmm... maybe it's.... no, I have no idea." I was cleaning up in my laundry room and found a can of chalkboard spray paint and thought I would go ahead and spray the tops of my canning lids (I don't know that this idea would work for actual canning, though).
DSC_1260
I already keep a little container of chalk in my kitchen for our little chalkboard in there, so it has proved very handy to just write the contents on the tops. And today, for lunch, I heated up potato soup, not homemade yogurt.