Are you ready for this?…
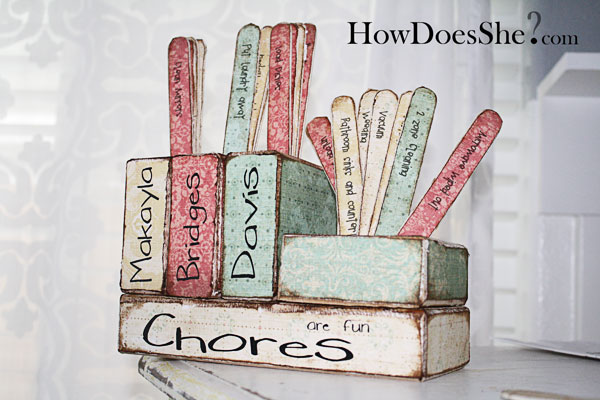
This is going to be the LONGEST tutorial you’ve probably ever seen, but don’t fret…it’s going to be worth it! An organized classy chore chart is headed your way. Can you even guess what this chore chart for multiple kids is made out of??? Yep, 2×4’s … another 2×4 decor idea. I LOVE how this turned out because I can leave it on my counter and it matches my home decor.
It also has a subliminal message for my kids to read all week, “Chores are fun”…one day they will agree…
If you missed the ever exciting tutorial on how to use a miter saw you are in luck…I just posted it earlier today. Check it out..it really is a fun read:)
Okay, on with the show:
Chore Chart for Multiple Kids
I cut with the miter saw 5 blocks of wood
4 of them were 3.5 x3.5 squares
1 of them was 8 inches long

I drilled one hole into the top of each of the 3.5 by 3.5 blocks. Do you like my band-aids? I was so glad this shot really brought out the 3 band-aids that I was lucky enough to be wearing during the making of this craft. Anyway, I used a 7/8 bit (as shown in the picture…nice shot Missy) and started drilling.

I ended up sandwiching the block I was drilling in-between 2 others just so I didn’t end up with more band-aids. A clamp would work well too! Ya, I’ll tell you in a minute why I have so many band-aids…

Then I had to put a little shoulder into it because I hit a knot and I had to make it work. Really…most of the time you don’t have to lean into it as much…I guess I’m a tad weak and needed a little oomph to get through that knot.

I finished the 3 holes in the three 3.5×3.5’s (there is a picture below).
The next hole I needed to make was a bigger one. I used a longer 2×4 because a small piece would have just spun and no hole would have been created. I was using a 2 inch bit for this one.

Here is an action shot. Look at the wood shavings fly…O and do you like my slippers:)

My bit wasn’t long enough to go through width of the 2×4 so I used my drill bit and made a hole to go through the entire board so when I flipped it over I knew where to place the 2 inch bit.

I flipped the 2×4 over and am sticking the 2 inch bit into the hole I just drilled. Giving me a guide to match up the bottom and the top. Keep reading…it gets better.
My bandaid story: I was making a sign for a friend and I was in a hurry and the drill bit wasn’t in the entire way. It slipped and caused me to wear band-aids. I wish I had some cool life saving story, but really it’s just me being in a hurry with a tool…I’m glad it wasn’t the miter saw:) Tools are great, but you have to be careful. O, I sound like my mother! I’ve been working with power tools for over 3 years and I think this is the worst of the injuries. I get hurt worse using knives in the kitchen…I will leave the cooking posts to Shelley! Really just be careful and you’ll be okay!

AHHHHHH…it worked. Honestly I didn’t know if it would work, but it did. YEA!

I had to add this picture of my little guy. And don’t worry I
don’t let him out to play with the saws. He had been sleeping (hence the bed head)but as soon as he was up, he wanted to see what was happening. Look at his chipmunk cheeks…LOVE it!

Okay here is the top shot.
THREE 3.5×3.5 inch boards with a 7/8 inch drilled down a little over half way.
One 3.5×3.5
with a 2 inch hole drilled through the center.
One 3.5×8 inch block under all of the above 4 blocks.

Mod podge the paper on. I used an amazingly sophisticated tool to cut a hole into the paper so the Popsicle sticks could fit down into it…a Hannah Montana pencil.
Apply the vinyl (your kids’ names and chores are fun). I used the
Silhouette to cut the black vinyl for this project. If you need vinyl or a vinyl lady check out our
vinyl 101.
You can thank Missy for figuring out how to make a template for the Popsicle sticks (they are for the thicker ones, like tongue depressors). There are 4 sheets and they are color coded. Why color coded? I was invited to go to a class a couple weeks ago on the topic of a ‘house of order’ by an amazing lady named Julie. After her class, I felt pumped up about house cleaning, dejunking, and doing laundry (really…).
I always have felt chores were ‘another thing’ to do on my list of ‘to do’s’ that never were crossed off because there was always something else to clean.
She gave a whole new perspective on house cleaning. She said she felt blessed when she did chores. She was happy to do laundry because it was another way she showed love to her family. She was happy to do it because she had a washer and dryer to make it easier. We are hoping to get her to do a post for us (hint…hint). I really have never heard someone so positive on cleaning and household chores.
Anyway, back to the color coding. She divides her chores up into how long they take…how long they ’should’ take:) Then, when assigning chores, the kids get to choose 2 two minute chores, 2 five minute chores and so on until all the chores are divided up evenly.
So, we put it into an easy format for you just to print them off on colored paper and easily attach them to Popsicle sticks.
All the 15 minute chores are on one sheet and I printed them on cream paper
The 10 minute chores are Yellow
The 5 minute chores are Red
The 2 minute chores are Green
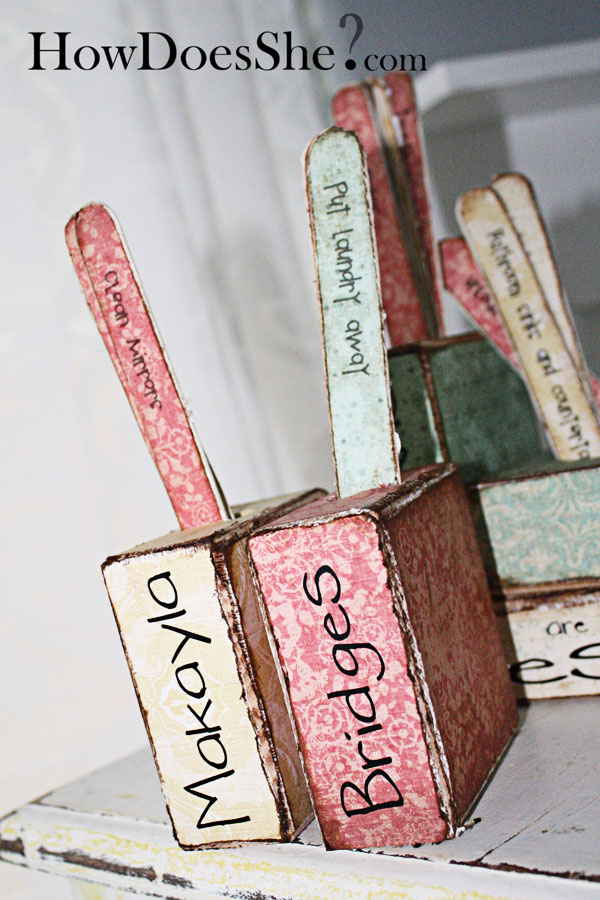
After I printed them out I mod podged them onto the Popsicle sticks.

I sanded them down and then stained the edges. Next time I need to wipe my table off before I take a picture. The crumbs are from blueberry muffins during snack time!

The kids get to choose. I will sometimes cover the chore name so they ‘blindly’ get their assignments.
They get their own block, put their chores in it and get to work. Some of you will notice Davis’ chores…he’s two and can’t wipe out the microwave, but I had to make him one so when he can he will be given the opportunity one day:)

When they are finished with their chore, the Popsicle stick goes back into home base! It helps them keep track of what they’ve done and what they need to do. Also, it’s helped me because I know what chores to check up on to make sure they’ve been completed. I started making this as a gift for someone, but I liked it so much I decided to keep it! Another cool thing…it was super cheap…’thrifty’ to make!
And one more shot of it because there are so many wonderful pictures in this post that I didn’t want you to forget what the final project looked like!
 8. I had my husband router the key hole in the back. {{I was tired and he was willing to help…yeppee!!}} If you don’t have a router just use picture hooks.
 11. And yes my husband helped me hang them because I don’t always hang things straight:){{or as he would say ‘never’ hang things straight} We need a tutorial on hanging pictures…Missy get on that!!


