From: U Create
Hi there! I'm Linda, the {craft}addict behind Craftaholics Anonymous. Yep, I'm a Craftaholic. I'm happy to say that I'm past the denial stage....thanks to a small intervention from the hubs. I'm a Craftaholic and proud of it!
I'm a SAHM with one cute little man who is a really good sleeper. He sleeps 12 hrs at night and two 1.5 hour naps during the day. So I have plenty of time on my hands. As you can probably guess, my blog is chock full of crafts. I sprinkle in tutorials and giveaways as well. And next week (Nov 23-27) I am doing a Tutorial Week where I bring you a new tutorial each day. And I have a giveaway lined up for the event too. It's going to be awesome!
Ok, back to business. I'm here to show you how to do this lovely Scripture Cover:
This is a fun, easy way to personalize your scriptures, or any book for that matter. I originally did this with a group of girls ages 8-11 at my church. They loved it! And now they are so good at remembering to bring their "cute" scriptures to church!
- Scriptures, preferably paperback
- scissors
- 1 sheet of pattern paper, does not need to be double sided
- coordinating cardstock
- paper trimmer
- hot glue gun
- double sided adhesive, I used 1/4" Scor Tape
- tape measure, I recommend a flexible one (this is one of my fav tools!)
- ribbon, two 4 1/2" strips
- paper flowers
- brad, jewel, bead, or button for the center of your flowers
Then measure how wide your scriptures are. Mine measured 7 1/8".
My original scripture cover measures 10 1/2" long by 7 1/8" wide. So I cut a strip of paper 12" long (adding 1 1/2" to allow for flaps) and 7 1/8" which is the exact width of my scriptures. So my paper is 12"x7 1/8". Make sure that if your paper has a stripe or design that has an "up" side, that you cut it accordingly.
Wrap the pattern paper around your scriptures and center the paper.
Then pinch the paper along the spine to create a crease. Do this to both sides of the spine.
Should look something like this.
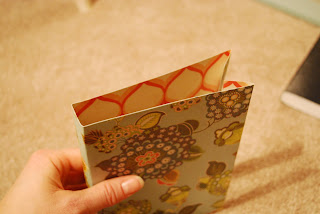
Next, fold the paper around the front and back cover, creating flaps as shown.
If you take your paper cover off right now, this is what it should look like.
Next, put your double sided adhesive on the edge of the front flap. Make sure that your scriptures are not backwards or upside down. :)
Fold over and press paper firmly so that the adhesive sticks well. Repeat for the back cover.
Next, I stamped the title of my scriptures on a small piece of cardstock. You could just print it out on your printer. (Just for your reference, the size of my title paper is 2 1/4" by 3".) I then used the blade of my scissors to rough up the edges and ran an ink pad around it. I also put Glossy Accents on the lettering. The scissors, inking, and Glossy Accents are purely optional. Next, cut a matte for your title. I did a 1/8" matte for mine.
Now to assemble your book. (we're almost done! wahoo!)
Using your double sided adhesive, put the title on the front. (sorry for the bad pic)
Next, hot glue one side of one ribbon to the front. The flower is going to hide where the ribbon is glued on, so be sure to play around with the flower beforehand to see where you want it and place the ribbon accordingly. After you have glued on your ribbon, glue the flower on top.
Then hot glue the other ribbon to the back.
And there you have it, fun personalized scriptures!
Thanks for inviting me, Kari! It's been fun sharing this tutorial. Have a great day everyone!


No comments:
Post a Comment